
|
|
Example - Pit Scenario Setup Defining the input data for your scheduling project |

Pit Scenario Setup
For reserves generation, Studio OP relies on the following key artefacts:
-
A high-level pit description
-
A geological model
-
A surface topography file
This exercise takes you through the managed workflow processes that are used to 'register' these data files within your project.
Prerequisites
-
You have completed Project Creation
Exercise: Define the pit
A Studio OP project can support 1 or more pit definitions. At least 1 pit must be defined in order to use it as a basis for a scheduling project. This tutorial describes the setup of a single-pit project.
- Using the Setup ribbon, select Manage.
- Just by opening this task, a default pit is created for you, named "Pit 1".
- Click inside the Name field and edit the name of the pit to "Scott Creek" and press <ENTER>.
- Select the Save
and Close icon in the top left corner of the panel:

Exercise: Define a Topography
A surface topography is required in order to generate sub-surface blocks.
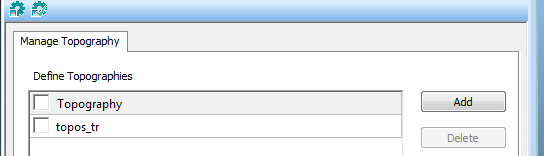
- Select the Surface Topo task on the Setup ribbon. This will open a new task - Manage Topography.
- There are no topography files associated with your pit, so click Add.
- In the Project Browser, select the [Topos_tr] option and click OK.
- A new option appears in the top table:
- You can define as many topographies as you
like within a project, but you can only associate one of them
with a pit.
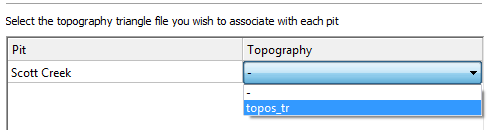
You have defined the one you want, so select the check box next to [topos_tr] to display it in the Task window.
Whenever you see a check box next to a data item in the Reserves workflow, it generally means that selecting it will display that data in the Task window. - To associate this topography with your pit,
expand the drop-down list in the lower table and select it from
the list:
Exercise: Define the model
Another key data file in reserves creation is the input model. In this exercise, the model you will use is created by Datamine's NPV Scheduler application. It contains data representing 3 pushbacks and a reserves category as described by an NPVDEST attribute. This phase is particularly important as it will dictate how reserves are calculated.
- On the Setup ribbon, select Model | Define. The previous task is still open, so you are prompted to save data (click Yes). Once this has been done, the Define Planning Model task is displayed.
- As you have not yet defined a model for your pit planning scenario, you will need to add one now; click Add.
- In the Project Browser dialog, select the [OPDemo3PB] item.
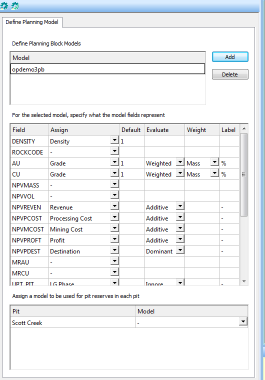
- Once loaded, the model is added to the list at the top of the dialog.
- As this is the first model that has been defined,
it is automatically analyzed. Studio OP will then attempt to automatically
map recognized fields to an appropriate scheduling attribute type:
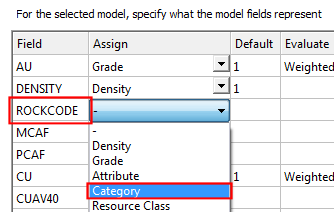
Studio OP will attempt to automatically detect attribute types where possible, but in this example, you need to make a manual edit. - In this case, the [ROCKCODE] field represents
the evaluation category. Locate the [ROCKCODE] field name in the
Field column, then expand
the drop-down list to select [Category] - this will ensure this
attribute is used in reserves calculation:
- Next, you need to assign the model to the pit
- select the drop down list at the bottom of the task panel and
select [simmodpl]:

Exercise: Validate your model
Once a model has been selected and 'mapped' to appropriate scheduling attributes, you can use the Validate managed task to check for potentially problematic model data, and view summary statistics.
- On the Reserves ribbon, select Model | Validate. Again, click Yes to save the data from the previous task.
- The resulting screen will show, for each planning
attribute within the input block model, whether there are any
absent values or negative values.
Negative grade values may give cause for concern and, whilst they may be expected in order to introduce downstream penalties, negative cost values may also require validation before you continue.
Your model doesn't contain any problematic values/fields, so you can proceed to the next exercise, in which you will define benches for your pit - Save and Close the Validate Planning Model task.